Blog Move / Blog-Umzug

I moved with the blog to a new site:

http://mysewingdreams.com/

Please use this new link to go to my blog. I will keep this old blog still online for some time but eventually close it. All posts are available on the new site.

I would be happy to see you all on my new site!

Ich bin umgezogen:

http://mysewingdreams.com/

Bitte benutzt diesen Link, um zu meinem neuen Blog zu gelangen. Ich werde den alten Blog noch eine Weile online lassen, aber ihn später schließen. Alle alten Beiträge sind auf der neuen Seite verfügbar.

Ich würde mich freuen, Euch alle dort wiederzusehen!

Posted in Uncategorized | 3 Comments

Butterick 6285: The Top and a Blog Announcement / Das Oberteil und eine Ankündigung

Before I start writing about this outfit that I already finished end of March I want to make an announcement. I have decided to make my blog bilingual. From now on I will write in English and German (hey, I am German after all). At the moment the possibilities are a bit limited and I will write each section in both languages. I do not like this very much because  this makes the reading a bit awkward. I will, however, move the blog in the near future and then I will have the possibility to add a button so that you can see the site either in English or in German. So please bear with me for the next few weeks.

Bevor ich endlich über diese Outfit schreibe, dass ich schon Ende März fertiggestellt habe, möchte ich eine Ankündigung machen. Ich habe mich dazu entschlossen, meinen Blog zweisprachig zu machen. Ab sofort werde ich alles in Deutsch und Englisch schreiben. Im Moment sind meine Möglichkeiten noch etwas eingeschränkt und ich werde abschnittweise in beiden Sprachen schreiben. Ich mag das nicht besonders, da es den Lesefluss stört. Ich werde aber bald mit dem Blog umziehen, und dann kann ich einen Button einfügen und man kann dann zwischen den Sprachen umschalten. Bitte habt bis dahin Geduld!

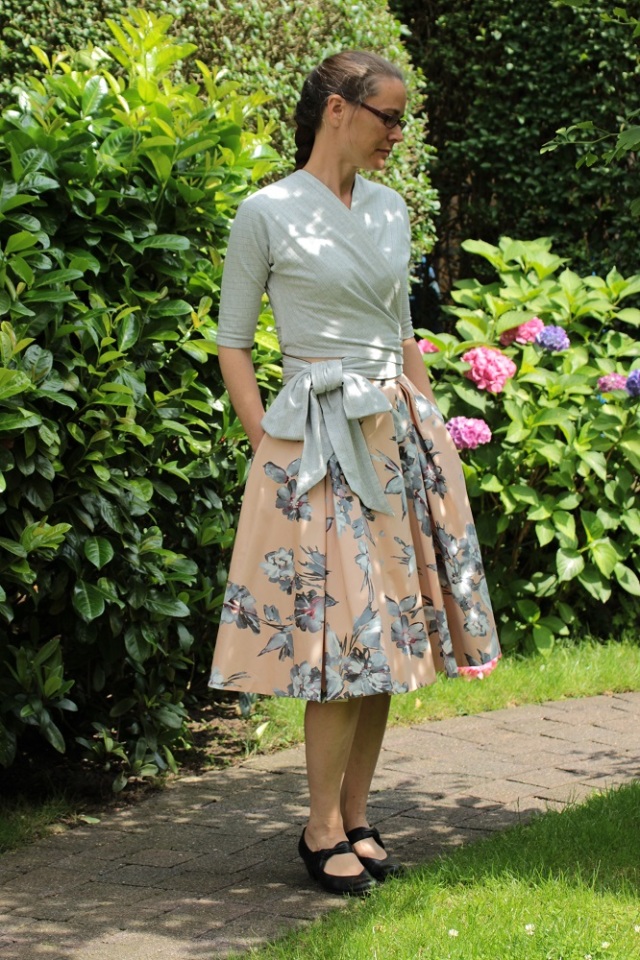
Now on to the top/skirt combo that I am really proud of. I made this to wear to my nephew’s first communion in April. I will write about the skirt in a separate post, so here is all about the top.

Butterick 6285 is one of Gertie’s patterns and she wrote a step-by-step instruction on her blog which I highly recommend reading if you plan to make the top. She really gives some helpful tips.

Jetzt aber zu der Kombination, auf die ich richtig stolz bin. Ich habe dies Outfit gemacht, um es zu der Erstkommunion meines Neffen im April zu tragen. Ich werde über den Rock in einem extra Post schreiben, hier also alles über das Oberteil.

Butterick 6285 ist eines von Gerties Schnittmustern. Sie hat eine ausführliche Schritt-für-Schritt-Anleitung auf ihrem Blog veröffentlicht, die sehr empfehlenswert ist. Sie gibt dort ein paar sehr hilfreiche Tips.

IMG_8762

IMG_8767Fabric /Stoff:

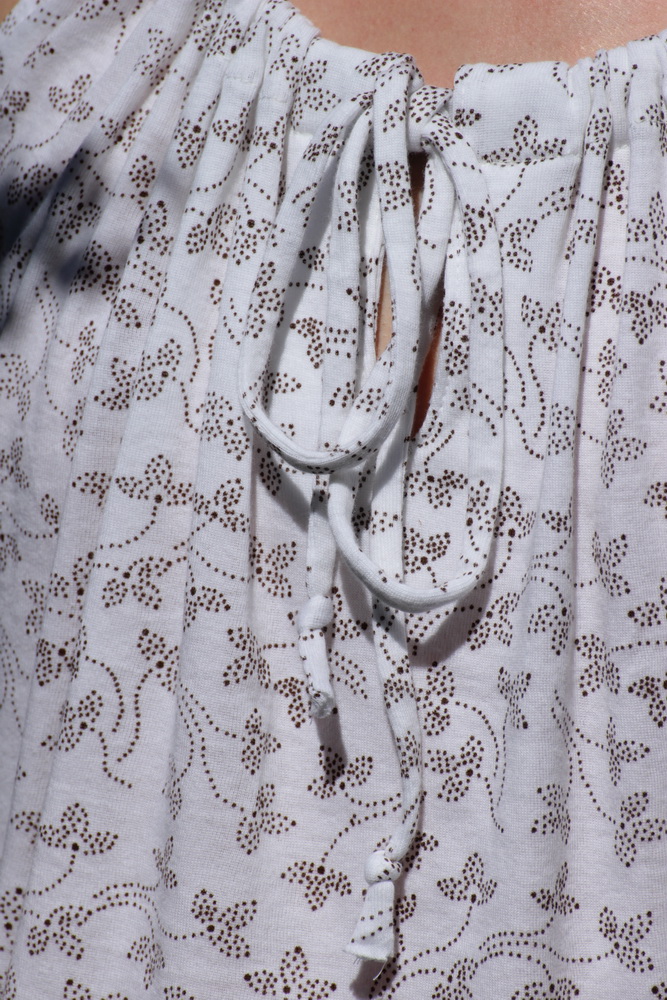
For the 3/4-sleeve version you need almost 2.5 m fabric. I did not have any knit fabric in my stash  that was long enough so I decided to use two different fabrics. The top is self-lined so I used one fabric as outer fabric and a second fabric as lining. I still had to piece the lining fabric. I used a lightweight cotton jersey in light grey with only mechanical stretch (from the leftovers I made my Vienna tank top) and a mediumweight cotton jersey in dark grey with spandex. The beauty of this is that the top is reversible.

Für die Version mit 3/4-Ärmeln benötigt man fast 2.50 an Stoff. Kein Jersey in meinem Vorrat war lang genug dafür. Also habe ich zwei verschiedene Stoffe genommen. Das Oberteil ist gefüttert, ein Stoff wurde der Oberstoff, der andere das Futter. Beim Futter musste ich trotzdem noch anstückeln. Ich habe einen hellgrauen dünnen Baumwolljersey (aus den Resten habe ich das Vienna Tank Top gemacht) und einen dunkelgrauen etwas schwereren Jersey mit Elasthan verwendet. Das Gute ist, ich kann das Top auch andersherum tragen.

IMG_8809

Alterations /Änderungen:

A very important point that Gertie mentions in her sew-along is, that the pattern piece for the ties is not long enough to get the look on the envelope. She suggest to add 10 inches. I did that and my ties are still not as long as on Gertie’s model, but long enough to tie a big bow.

Ein ganz wichtiger Punkt, den Gertie bei ihrem sew-along erwähnt ist, dass das Schnittteil für das Bindeband nicht lang genug ist, damit es so aussieht wie auf dem Bild vom Umschlag. Sie empfiehlt, es um 10 inch (= 25,5 cm) zu verlängern. Das habe ich gemacht, und mein Band ist immer noch nicht so lang wie bei Gerties Top, aber lang genug, um eine große Schleife zu binden.

IMG_8760

After I made a muslin these were the changes I made to the pattern:

  • shortening the front edge by 3 cm to prevent gaping
  • adding 2 cm to the sleeves seam at the hem tapering to nothing at the top (I found the sleeves to be very tight)

Ich habe zuerst ein Probeteil gemacht und dann folgende Änderungen an dem Schnittmuster vorgenommen:

  • vordere Kante um 3cm gekürzt, damit der Ausschnitt nicht absteht
  • 2 cm unten an der Ärmelnaht zugegeben und nach oben hin auslaufen gelassen (ich fand die Ärmel sehr eng)

Construction Notes:

The construction is a bit special. You only have two pieces, one in the outer fabric and one for the lining and the pieces for the tie. You sew everything together along the outer edge and turn it right sides out in the end.

Das Zusammennähen ist etwas speziell. Es gibt nur zwei Teile: eins aus dem Oberstoff, das andere aus Futter, und die Teile für das Bindeband. Alles wird an der äußeren Kante rechts auf rechts zusammengenäht und dann nach  außen gewendet.

Conclusion /Fazit:

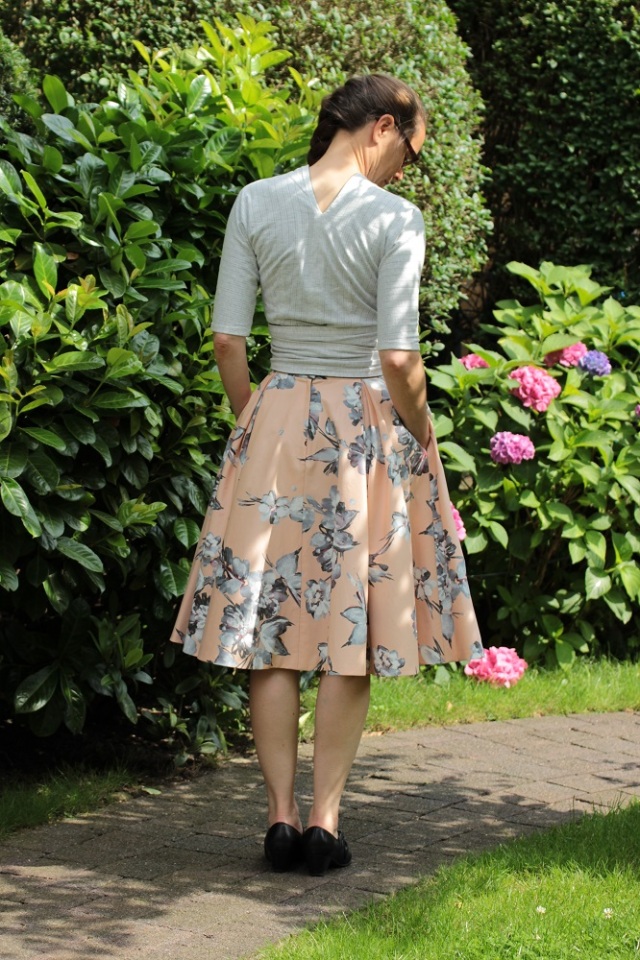
The top is really short and you get it to cover the body up to the waist only with the ties. Actually you wrap the ties below the top, not over it. After a day of wearing I noticed that there was a small gap between the bottom of the back and the tie. In a next version I would lenghten the bodice a few cm.

This is a very special style and you need a waist-height bottom to wear it with. But you can also wear it over a dress. I did this once and it worked out beautifully. All in all I am happy how this turned out and I just love this big bow.

Das Oberteil ist sehr kurz und es geht nur durch das Bindeband bis zur Taille. Man wickelt das Band tatsächlich unterhalb von dem Top, nicht über dem Top. Nachdem ich es einen ganzen Tag getragen hatte, war zwischen Oberteil und Bindeband im Rücken eine kleine Lücke. Wenn ich das Top noch einmal nähe, dann werde ich das Oberteil auf jeden Fall einige cm länger machen.

Dies ist ein sehr eigener Stil, und man braucht schon Rock oder Hose, die bis zur Taille gehen. Man kann es aber auch über einem Kleid tragen. Ich habe das einmal ausprobiert und es hat wunderbar funktioniert. Alles in allem freue ich mich sehr über dieses Top und ich liebe einfach diese große Schleife.

Linked to After Work Sewing

Posted in Butterick, sewing, Top | Tagged , | 16 Comments

Itch to Stitch Zamora Blouse

It has been a bit quite here on the blog. I was working on another project and then went on holidays. But now I am back and will try to catch up with my backlog.

There was no June bra as promised. Somehow it did not happen. I already had an idea and pulled out some fabric but then I did not have the right notions. This is what really annoys me with bra making, all those different elastics, hook-and-eyes, rings etc that you need and that never happen to be in my stash in the color I want. As I will hopefully attend a bra pattern making workshop next week I decided to postpone bra making until then.

But now on to the Zamora Blouse. Begin of March, Kennis released a mini wardrobe collection consisting of a turtle neck top, a blouse, a skirt and a jacket. I was happy enough to test the blouse pattern. I like this style with V-neck and bow-tie. I have the Style Arc Tiffany Blouse pattern in my stash for quite some time but never got around to sew it, so I thought I might as well join the Zamora Blouse test sew. It seems that lately I somehow manage to finish a project only when there is a deadline.

IMG_8743_Bildgröße ändern

IMG_8727_Bildgröße ändern

IMG_8724_Bildgröße ändern

Fabric:

The fabric is a cotton shirting with tiny black stripes. It was a left over from my button up that I sewed in 2014. As this fabric is great for a classic shirt it is a bit too stiff for this style. I think more drapey fabrics will be much more suitable for the Zamora blouse.

Alterations:

I sewed a size 2 A cup tapering to a size 4 at the hips. When I tried the blouse on I was not happy at all with the darts. For the A cup size the front darts start just below where the pleats open. In my opinion this does not really work. Also the back darts where not at the right place for my body. Kennis suggested to leave the darts out and that is what I did as  I liked the loose fit. Other testers did not have this issue so this is special for my body shape and not an issue with the pattern.

Construction Notes:

As I made the blouse a few months ago I do no longer remember the details of the construction. The instructions were clear as usual for Itch-to-Stitch patterns. The only part that was a bit tricky was the attachment of the collar/tie at the front. Else it is just the same as for any other blouse/shirt pattern.

Conclusion:

The V-neck is too low for my personal preference. The bow adds a little bit in height, but not enough for me to feel comfortable. This can however be solved easily for the next version. The other issue I do not like too much about the blouse is how the collar lies against the neck. It does not lie flat but makes some wrinkles. This might be due to the stiff fabric. However, with some changes and figuring out where to place the darts this pattern will work for me.

Disclaimer: I got the pattern for free in exchange for testing it. All opinions are my own. This post uses affiliate links.

Posted in Uncategorized | 2 Comments

Itch to Stitch: Vienna Tank

When Kennis from Itch to Stitch called for a pattern testing I could not resist. I did need a break from my attempts to fit some Style Arc trousers and what better excuse than to sew a cute summer top. May I introduce the Vienna Tank:

IMG_8091_Größeändern

The Vienna Tank features a yoke with a neckband and tie and optional ruffles. Of course I made the version with the ruffles. It has a slightly cropped length and gathers at front and back.

IMG_7954_Bildgröße ändernIMG_7998_Bildgröße ändern

The hem is not curvy but straight, seems I am standing a bit weird.

Fabric:

The pattern calls for a woven for the yoke and a lightweight knit for the main body. But you can also use a woven for the main body.  A lot of the other testers did this with beautiful results. I used an eyelet batiste for the yoke and a lightweight cotton knit with little stretch. Both fabrics were leftover scraps from my stash. This pattern is great for using scraps, especially for the yoke. As I wanted my top to go with my Angelia Shorts I chose solid colors. But this pattern is great for color blocking or using prints.

Alterations:

I made a size 2 tapering to a 4 at the hips. This is my usual size with Itch to Stitch patterns. Else I made no alterations. On the first version the armholes were a bit tight but Kennis fixed this for the final version. I think the yoke is a bit small in the back for me. I often have to make Itch to Stitch patterns wider in the shoulder. For other testers the size is spot on, so this is a personal issue.

Construction Notes:

As usual the instructions are very detailed and very well thought out. The cut-on facing at the center front is folded to the outside and topstitched down. This adds a nice details to the top. I used white thread for the topstitching as I was to lazy to change thread as this connects the white and grey fabric.

IMG_8132_Bildgröße ändern

The ruffles and neckband are a bit finnicky to sew but with a bit of patience not really difficult. Just take your time to distribute the ruffles evenly.

IMG_8127_Bildgröße ändern

Conclusion:

I LOVE this top. Such a cute little summer top, perfect for the hot days we have at the moment. I already made a second version and I think there will be a few more in the future.

Disclaimer: The pattern was given to me for free in exchange for testing. All opinions however are my own. This post has affiliate links.

Posted in Itch to Stitch, pattern tester, Top | Tagged , , | 7 Comments

May Bra: modified straps

My bra journey continues. The next lesson in my craftsy class is all about straps. For this bra I made short tapered straps:

IMG_7887_Bildgröße ändern
This is a quite easy alteration. The strap extensions (if any) are cut away and the top of the cup is straightened (which mine was already) and for the straps a piece of fabric is folded in half and sewn to the top cup.

IMG_7871_Bildgröße ändern
The neckline is finished with picot elastic. I like how the elastic peaks out in front of the strap. If you use an elastic in a different color from your main fabic this will stand out even more.

Here is how it looks on the inside. You see that the strap was sewn to the cup when I made the second row of stitching for the elastic.

IMG_7893_Bildgröße ändern

I lined my cups again with a cotton jersey. For this bra I took my time while sewing and it looks much neater than the one before. I also made a row of topstitching on the inner outer side of the underwire as shown in Beverlys first class. This really helped to avoid shifting of the fabric when sewing the second pass of the underwire casing.

I also made the lower cup a bit larger. For this I raised the upper edge about 1.5 cm. In the picture below you see the original cup piece on the left and the new one on the right.

IMG_7932_Bildgröße ändern

However, this did not really solve the problem that the bust point is above the cup seam. The lower cup now is somehow rather flat at the bottom. For the next version I will try to make a vertical seam in the lower cup and add a bit along that seam. I also realized if I make one bra for every change that Beverly shows in her class I will end up with a lot of bras. So from now on I will combine two or more changes in one bra. And if I achieve a fit and combination that I really like I will make it up in a pretty fabric. But for now you will have to bear with my boring plain abricot bras. The advantage on the other hand is that I can compare my bras really well as I always use the same fabric and notions. See you next month for the June bra!

Posted in bra, lingerie, sewing | Tagged , , | 5 Comments

Style Arc Posh Top

This year I really thought about participating in “Me Made May”. But I do not need any motivation to wear my me made clothes. And I wear “me made” everyday, sometimes just my socks are not me made, sometimes only my undies are me made. The only challenge for me would be the daily photoshoot (ok, this would be a real challenge, but I do not want to take that). So I just continue with my usual posting and try to finally catch up with my backlog. Here is the first one, completed already three weeks ago.

After finishing my Butterick 6285 ensemble (no decent pictures yet….) I wanted to sew something “quick and easy”. I need some tops for summer, so I sewed the Style Arc Posh Top. This is a cute little top with gathers from the neckline and with cord shoulder straps.

POSH-TOP

Source: Style Arc

Yesterday it was finally warm enough to take some pictures!

IMG_7471_Bildgröße ändern

IMG_7475_Bildgröße ändern  IMG_7482_Bildgröße ändern

Fabric:

The fabric is a cotton single jersey from The Smugglers Daughter. I liked the print, but when the fabric arrived I was a bit disappointed because it is really thin and it does not have any recovery and felt like it would stretch out only by looking at it. So it lay in my stash for some time. I think (hope) that it works with this pattern though as this is a loose style. Style Arc recommends to use “soft falling knit fabric”. This is important due to the gathering at the neckline. I think you could also try a lightweight woven fabric.

Alterations:

I sewed a size 8. I added 2 cm to the side seams at the hem, but took this out again as the hem got too flared. I also tried to shape the waist a bit more (despite the line drawing the side seams are a straight line from armhole to hem) but somehow the top got distorted. In the end I made no changes at all.

Construction Notes:

For the cords I folded my fabric strip in half and serged along the raw edge. I then used the thread tail to turn the tube inside out. This worked like a charm.

IMG_7472_Bildgröße ändernFor the armhole the edges are just folded to the inside and topstichted in place. I tried to make sure not to stretch the fabric and gave it a good steam afterwards.

IMG_7484_Bildgröße ändern

The hem allowance is wider than I would usually make for a T-Shirt, but with this lightweight fabric it adds a little bit of weight to the hem and I like it.

Conclusion:

This is an easy little top, perfect for summer. You can adjust the neckline with the cord, but you should still be aware that there is some gaping when you bend over. But I think for such a loose fitting style this is normal.

Linked to Me Made Mittwoch

Posted in Style Arc, Top | Tagged , , | 2 Comments

Little Owls

Sometimes, but only sometimes, I do not sew lingerie or gaments. I am not much in home decor sewing or quilting or accessories like bags. But last weekend I made these cute little fellows:

IMG_7387_Bildgröße ändern


I first saw this pattern on Rhonda’s blog and wanted to make some since then. It just took me nearly 1 1/2 years…Rhonda posted a lot of details how to make these including a link to the pattern and also a video. So check out her posts here, here and here out if you want to make some for yourself. I made mine without a washer as they are just decorative and I do not want to use them as a pattern weight. They are stuffed with cotton batting. And I discovered they are great to use some fabric scraps (which I have far too much).

What is your favorite use for fabric scraps? I need some ideas, please let me know in the comments!

IMG_7389_Bildgröße ändern


Posted in sewing | Tagged | 1 Comment

How to line foam cups

Today I will show you how to line foam cups. There might be other techniques but this is how I do it.

When I start sewing a bra I like to lay out all my pieces rouhgly like they will be sewn into the bra. This is especially important if you have right and left cup pieces that look almost the same. If ever possible I try to have the pieces lying in this order on my sewing table until they are used.

IMG_7341_Bildgröße ändern

1. Take your lower cup pieces and lay the wrong side of the lining onto the inner side of the foam:

IMG_7351_Bildgröße ändern

2. Baste along the cup seam (this is the upper edge that will be sewn to the upper cup). Do not yet baste along the other edges.

3. Do the same with the upper cup pieces. Baste along the lower edge.

IMG_7356_Bildgröße ändern

4. Sew the upper and lower cup together by butting the edges together. I use a “Wabenstich” for this seam (stich no 19 in the picture below. How is it called in English?). If you do not have one you can also use a 3-fold zigzag stitch.

IMG_7363_mod_klein
I also like to sew a seam tape to the outer side of the cup in the same step. This prevents the seam from showing through on the outside.
IMG_7358_mod_klein

This is how it looks on both sides:

IMG_7364_Bildgröße ändern
5. Prepare your bias tape. I cut a silk strip on the bias. It should be at least 1.5 cm (5/8 ”) wide. First fold the tape in half and press:

IMG_7365_Bildgröße ändern
Open up the tape again and press both sides using the fold in the center as a guide

IMG_7366_Bildgröße ändern

Now you are ready to sew the bias tape onto the cup seam.

IMG_7367_Bildgröße ändern

You can also use purchased bias tape or satin ribbon or anything else that is wide enough to cover the seam.

6. Lay the bias tape over the inner cup seam and sew with a slightly longer straight stitch (3.5) along both edges.

IMG_7369_Bildgröße ändern

On the outside the stitches are hidden

IMG_7370_Bildgröße ändern

7. Baste the lining to the outer edges of the foam. Make sure that is lays flat on the foam. The lining might be slightly bigger (because it is on the inside of the curved cup). Trim away the excess lining (I haven’t done this yet on the picture below). Now you are ready to sew your bra as usual.

IMG_7371_Bildgröße ändern

I hope this little tutorial (my first one!) was helpful. I have already ideas to use a contrasting fabric for the lining to give a bra some extra appeal.

Posted in bra, lingerie, sewing, Tutorial | Tagged , , | 4 Comments

April Bra: BHS10 modified

It has been a bit quite here on the blog. If you follow me on Instagram you might have seen that I did sew, but I just was not in the mood of taking pictures and writing a blog post. I had some busy weeks and now that everything is back to a normal pace I try to catch up with my backlog.

But first I will share my latest make, a new bra. As I said in my last post I am working through the craftsy class “Sewing bras designer techniques”. Beverly uses a bra with a 2-piece cup for demonstrating the alterations. I thought it might be easier to follow the class if I changed my Merckwaerdigh BHS10 3-piece cup to a 2-piece cup. This meant to eliminate the power bar. At the end of the class is a lesson how to add a power bar. So I made just the opposite.

As I was really unsure if this would work out and if I would like the result, I first made a few paper cups and then sewed the bra in some rather boring material. I have a lot of this fabric, so I will use it for trial bras in the future too.

IMG_7349_Bildgröße ändern


IMG_7348_Bildgröße ändernIn addition to altering the cups, I also tried some other techniques. I lined the cups with cotton knit and finished the cup seams on the inside with silk bias tape that I made from some silk scraps. This needs still some improvement, but I love the result. It looks nice and clean and the feel on the skin is really cozy. For the lining I cut the cotton knit the same size as the foam pieces, basted them together and treated them like one layer. I did this to avoid the bulk of additional seam allowances on the cup inside.

IMG_7343_Bildgröße ändern

Else there is not much to say about this bra. I like the shape of the 2-piece cup. For my next bra I will try to give more volume to the lower cup as my bust point is above the cup seam. I have this also with my other BHS10 bras so this is not a result of my alteration.

Posted in bra, lingerie | Tagged , , , | 2 Comments

March Bra: BHS10 modified

I decided to work my way through the Craftsy class “Sewing Bras – Designer Techniques” from Beverly Johnson. The first lesson is about how to change your full band bra into a partial band bra. This is not so difficult once you understand the main difference between both styles. In a full band bra the channeling for the wires lies outside the cups and is sewn onto the band. In a partial band bra the channeling lies inside the cup. This is logically as there is no band under the cup where the channeling could be sewn onto. Basically you have to make the cups bigger at the side where the channeling will be and change the band and bridge.

I used my TNT Merckweardigh BHS10 pattern and here is what I came up with:

IMG_7320

IMG_7319Besides of changing the pattern to a partial band bra I also altered the straps. For this more delicate bra I did not want to have the fabric straps. So I just cut them of.

I still have a lot of that stretchy lace fabric left over that I used for my lady shorts and the bralette. In fact I wanted to make a bra that goes with the ladyshorts. The cups are lined with unstretchy skin colored tulle. The band is one layer of powernet.

IMG_7318

The order of construction is a bit different than for a full band bra, but Beverly also explains how to sew the partial band bra in the class. I like how a lot of the inside seams are finished with the channeling. Who does not love a clean inside? For the neckline I tried a new to me technique and finished it with a picot elastic. I like the look.

IMG_7327

Unfortunately, I think I made a mistake with the bridge. It turned out to be too wide, and it is about 0.5 cm wider than on my other bras. This causes the upper cup to make wrinkles. You do not see it on the dummy as she has a bigger bust size than me.

I wish you all a lovely Easter weekend!


Fabric: black stretchy lace (source unknown), tulle from Sewy

Powernet, elastics and channeling: Wien2002

Underwires: Spitzenparadies

Posted in bra, craftsy, lingerie | Leave a comment